
Welcome to the Viper 5706v Installation Manual, your comprehensive guide to installing and configuring your advanced car security system. This manual provides step-by-step instructions, wiring diagrams, and troubleshooting tips to ensure a smooth setup. Follow the detailed process to harness the full potential of your Viper 5706v, including remote start and security features. Proper installation ensures optimal performance and protection for your vehicle.
Overview of the Viper 5706v System
The Viper 5706v is a state-of-the-art car security and remote start system designed to provide advanced protection and convenience for your vehicle. It features a robust remote start function, comprehensive security sensors, and customizable settings to tailor the system to your needs; The system includes a control center, sensors, and wiring components necessary for installation. With its user-friendly interface and advanced features like virtual tach and crankshaft sensors, the Viper 5706v ensures seamless integration with most vehicles. This system is known for its reliability, durability, and ease of use, making it a popular choice among car owners seeking premium security solutions.
Importance of Following the Installation Manual
Adhering to the Viper 5706v installation manual is crucial for ensuring a proper and safe setup of your car security system. The manual provides detailed, step-by-step instructions and wiring diagrams to guide you through the process accurately. Deviating from the guidelines can lead to system malfunctions, security vulnerabilities, or even damage to your vehicle’s electrical system. Proper installation ensures all features, such as remote start and sensors, function as intended. Additionally, following the manual helps maintain your warranty and guarantees optimal performance and reliability. Ignoring the instructions may result in safety risks or reduced system effectiveness, compromising your vehicle’s protection.

System Requirements and Compatibility
The Viper 5706v is designed for compatibility with a wide range of vehicles, ensuring reliable performance across different makes and models. Specific hardware and software requirements are outlined to ensure seamless integration with your vehicle’s electrical system. Compatibility checks are essential to avoid installation issues and guarantee optimal functionality of the security and remote start features. Proper system requirements ensure the Viper 5706v operates efficiently, providing advanced protection and convenience for your vehicle.
Vehicles Compatible with the Viper 5706v
The Viper 5706v is compatible with a wide range of vehicles, including domestic and imported models. It supports both automatic and manual transmissions, ensuring versatile installation options. The system is particularly recommended for vehicles equipped with advanced electrical systems, as it integrates seamlessly with modern automotive technology. Compatibility extends to vehicles with push-to-start ignition systems, though specific configurations may require additional wiring or adapters. Always consult the installation manual or a professional installer to confirm compatibility with your vehicle’s make and model, ensuring optimal performance and functionality of the security and remote start features. Proper compatibility ensures a hassle-free installation process.
Hardware and Software Requirements
The Viper 5706v system requires specific hardware and software to function optimally. Essential hardware includes a compatible control module, wiring harness, and sensors for accurate vehicle monitoring. Ensure your vehicle’s electrical system supports the remote start and security features. Software-wise, the latest firmware must be installed to enable advanced functionalities like remote start and tach sensing. Regular updates are crucial for maintaining system performance and security. Always use genuine Viper components to avoid compatibility issues. Refer to the installation manual for detailed specifications and ensure all components are properly integrated for reliable operation. Proper hardware and software setup guarantees seamless functionality and enhanced vehicle protection.
Pre-Installation Checklist
Review the manual, ensure vehicle compatibility, gather tools, and disconnect the battery before starting. This ensures a safe and efficient installation process.
Tools and Materials Needed
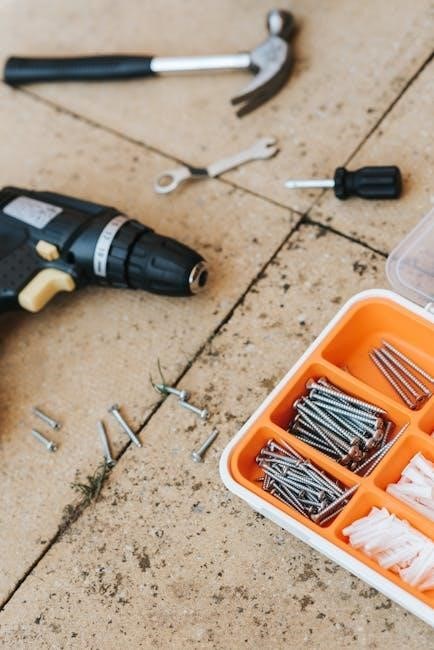
To install the Viper 5706v, you will need essential tools and materials. These include a screwdriver set, pliers, wire cutters, and connectors for wiring. A multimeter and voltage tester are recommended for verifying electrical connections. Additionally, a drill and mounting hardware may be required for securing components like the control center and sensors. Ensure you have the correct fuse taps and wiring harness for your vehicle’s specific setup. Having all materials ready beforehand will streamline the installation process and prevent delays. Proper preparation ensures a smooth and successful setup of your Viper 5706v system.
Safety Precautions Before Starting
Before starting the installation of your Viper 5706v system, ensure all safety precautions are followed to avoid accidents. Disable the car alarm to prevent accidental triggering and disconnect the negative battery terminal to avoid electrical shocks. Use a voltage tester to confirm no power is present. Wear insulated gloves and safety goggles for added protection. Ensure the vehicle is stationary, with the parking brake engaged, and on level ground. Do not rush the installation, and strictly follow the instructions provided in this manual. After completing the installation, test the system thoroughly to ensure proper function and safety.

Installation Process
The Viper 5706v installation involves connecting components like sensors, wiring, and the control module. Follow the manual for step-by-step guidance to ensure proper system integration.
Step-by-Step Guide to Installing the Viper 5706v
Begin by disconnecting the vehicle’s battery to ensure safety. Locate the wiring harness and connect the necessary cables to the control module. Mount the sensors securely, following the manual’s placement recommendations. Once all components are installed, reconnect the battery and test the system. Use the remote to activate features like remote start and security functions. Refer to the wiring diagrams for precise connections and consult the troubleshooting section if issues arise. Proper installation ensures reliable performance and optimal vehicle protection. Follow each step carefully to avoid errors and ensure seamless integration of the Viper 5706v system.
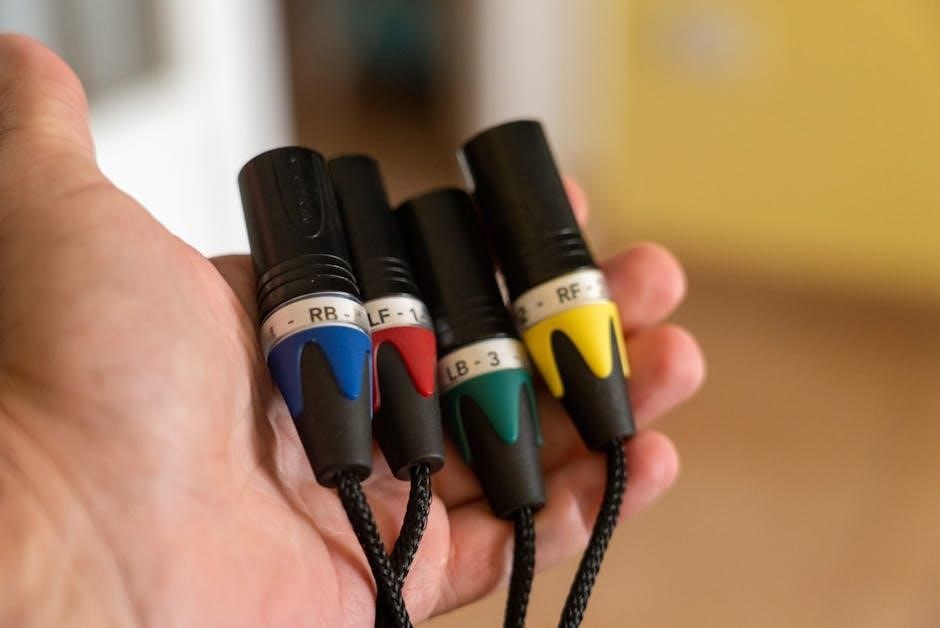
Wiring Diagrams and Connections
The Viper 5706v installation manual provides detailed wiring diagrams to ensure accurate connections. Begin by identifying the vehicle’s wiring harness and matching it to the system’s components. Connect the power wire to the battery’s positive terminal and the ground wire to a metal chassis. Sensor wires should be linked to door, hood, and trunk triggers. Remote start wiring requires connections to the ignition, accessory, and starter circuits. Use the diagrams to avoid miswiring, which can cause system malfunctions. Double-check all connections with a multimeter before finalizing. Proper wiring ensures reliable performance and prevents potential damage to the system or vehicle. Follow the manual’s color-coded guide for clarity.
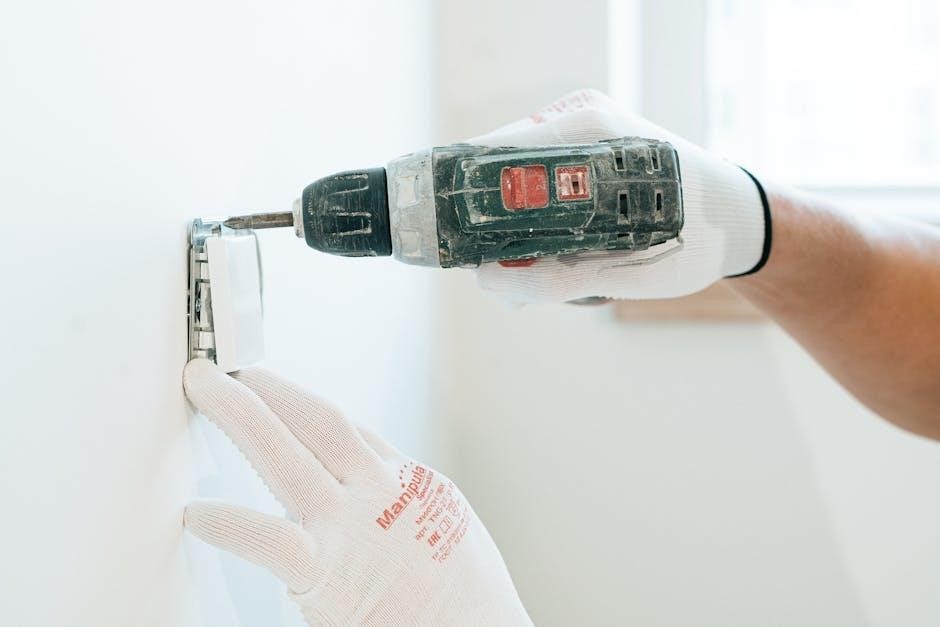
Mounting the Control Center and Sensors
Mount the Viper 5706v control center in a secure, dry location, such as under the dashboard or near the steering column. Ensure it is protected from heat and moisture. For sensors, install door, hood, and trunk sensors in strategic locations to detect unauthorized access. Use screws or adhesive for a firm mount. Align sensors for optimal detection and adjust sensitivity as needed. Ensure wiring is neatly routed and securely connected to prevent damage. Test each sensor post-installation to confirm functionality and adjust settings to minimize false alarms. Proper mounting ensures reliable performance and comprehensive vehicle protection.
Programming the Viper 5706v
Program the Viper 5706v to customize features like remote start, sensor sensitivity, and security settings. Follow the manual for precise instructions to ensure proper functionality.
Understanding the Remote Start Feature
The remote start feature of the Viper 5706v allows you to start your vehicle from a distance, ensuring your car is ready to go when you are. This feature is particularly useful in extreme weather conditions, providing comfort and convenience. To activate the remote start, press and release the remote’s start button twice. The system will confirm the process with indicator lights and sounds. Ensure your vehicle is in park or neutral, and all doors are closed for the remote start to function properly. This feature enhances your driving experience by offering unparalleled control over your vehicle’s startup process.
Programming the Virtual Tach and Crankshaft Sensors
After installing the Viper 5706v, programming the Virtual Tach and Crankshaft sensors is essential for proper functionality. Begin by ensuring all connections are secure. Remote start the engine to initiate the Virtual Tach learning process, which may require up to three ignition cycles. Once the engine runs smoothly, the Virtual Tach is successfully programmed. For the Crankshaft sensor, refer to the wiring diagram to ensure correct installation and configuration. After programming, test the system to confirm accurate sensor readings and seamless operation. Proper programming ensures reliable performance of your vehicle’s security and remote start features.
Setting Up the Security Features
Setting up the security features on your Viper 5706v ensures maximum protection for your vehicle. Begin by arming the system using the remote control. The Viper 5706v includes features like shock sensors and a siren to deter intruders. After installation, test the sensors by triggering them (e.g., opening a door or trunk) to ensure the alarm activates correctly. Adjust the sensor sensitivity if necessary to minimize false alarms. Use the remote to cycle through menu options, such as Menu 3, to configure settings. Finally, verify that the siren is functioning properly and all sensors are calibrated for optimal performance. Proper setup ensures reliable security for your vehicle.

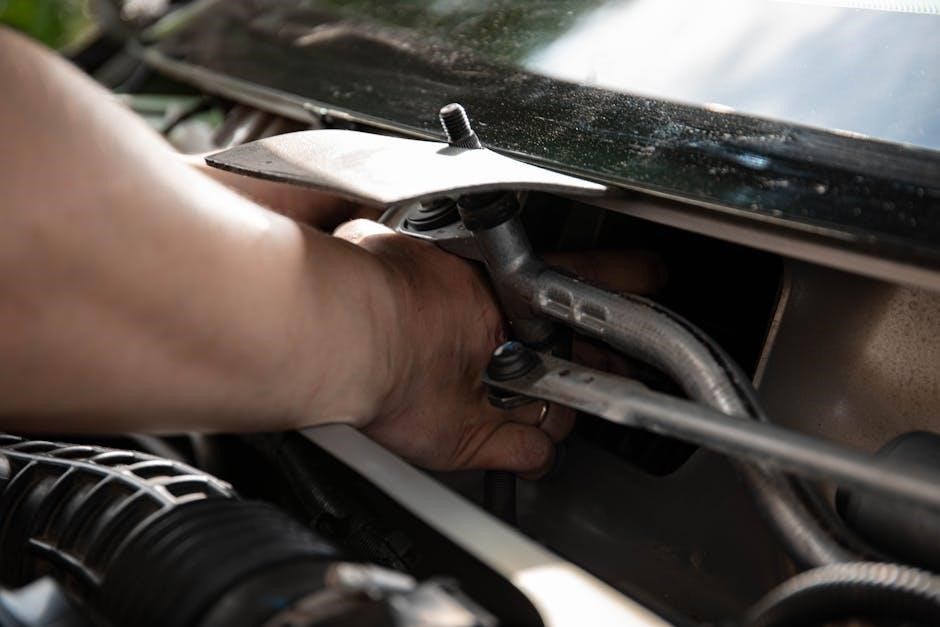
Wiring and Electrical Connections

Proper wiring connections are essential for the Viper 5706v system. Connect the power wire to the vehicle’s battery, ensuring a secure ground connection. Sensor wires should be routed carefully to avoid interference. Follow the wiring diagram for remote start and alarm connections. Double-check all connections for tightness and accuracy to prevent system malfunctions. Use appropriate gauge wires for reliable performance and longevity of the system.
Power and Ground Connections
The Viper 5706v system requires a stable power supply. Connect the positive power wire directly to the vehicle’s battery, ensuring a secure connection. The ground wire must be attached to a clean, bare metal surface on the chassis to avoid electrical interference. Use a high-quality, appropriately gauged wire (e.g., 8 AWG) for these connections. Install an inline fuse near the battery to protect the system from short circuits. Route the wires away from heat sources and moving parts to prevent damage. Secure all connections tightly and test the system to confirm proper functionality. Proper power and ground connections are critical for reliable system operation.
Sensor and Alarm Wiring
Proper wiring of sensors and alarms is essential for the Viper 5706v system to function correctly. Begin by connecting the door, hood, and trunk sensors to the appropriate inputs on the control module. Use the blue wire for door triggers, green for hood and trunk sensors, and yellow for the shock sensor. Ensure all connections are secure and free from interference. Route wires neatly, avoiding heat sources or moving parts. For the shock sensor, adjust the sensitivity using the trim pot to avoid false alarms. Finally, connect the siren and LED indicator to the designated outputs. Test all sensors and alarms to confirm proper operation before finalizing the installation.
Remote Start Wiring Requirements
For the Viper 5706v remote start feature, connect the control module to your vehicle’s ignition, starter, and accessory circuits. Use the pink wire to connect to the ignition switch’s accessory terminal. The yellow wire links to the starter motor, ensuring the engine turns over during remote start. If your vehicle has a high-current starter, install a relay to handle the load safely. Connect the orange wire to the parking lights to confirm remote start activation. For manual transmissions, ensure the clutch switch is wired correctly. Always refer to your vehicle’s wiring diagram for accurate connections. Proper wiring ensures reliable remote start functionality and prevents damage to your system or vehicle.
Troubleshooting Common Issues
Troubleshooting the Viper 5706v involves diagnosing issues like remote start malfunctions, security errors, or wiring problems. Check connections, ensure proper sensor alignment, and verify system programming. Refer to the manual for specific error codes and solutions to resolve issues effectively.
Diagnosing Installation Problems
Diagnosing installation issues with the Viper 5706v requires a systematic approach. Start by checking all wiring connections to ensure they are secure and correct. Verify that the remote start and security features are programmed properly. Common issues include faulty sensor alignments, incorrect wiring, or improper system configuration. Use the remote control to test each feature and identify malfunctions. If the system fails to respond, reset it by disconnecting the battery and reconnecting it. Refer to the manual for specific error codes and troubleshooting steps. Always follow the manufacturer’s guidelines to resolve issues effectively and maintain system performance.
Resolving Remote Start Malfunctions
Resolving remote start malfunctions with the Viper 5706v involves checking several key components. First, ensure the remote control has a strong signal and sufficient battery life. Verify that the system is properly programmed, especially the virtual tach and crankshaft sensors. If the engine doesn’t start, check the wiring connections to the ignition, starter, and fuel pump. Ensure the MTS mode is set correctly for manual transmissions. Consult the installation manual for specific troubleshooting steps, such as resetting the system or reprogramming sensors. Addressing these issues will restore remote start functionality and ensure reliable performance.
Fixing Security System Errors
Fixing security system errors with the Viper 5706v involves diagnosing and addressing common issues. Check for loose wiring connections, especially to sensors and the control module. Ensure the system is properly armed and disarmed using the remote. If the alarm triggers without cause, adjust sensor sensitivity to reduce false alarms. Review the installation manual for troubleshooting specific error codes or chirp patterns. Resetting the system or reprogramming sensors may resolve persistent issues. Regular maintenance and software updates can also prevent errors, ensuring your vehicle remains protected with reliable security features.
Advanced Features and Customization
Explore advanced customization options for your Viper 5706v system, including adjusting sensor sensitivity, tailoring alarm settings, and integrating with other vehicle systems for enhanced functionality and security.
Adjusting Sensor Sensitivity
Adjusting sensor sensitivity ensures optimal performance of your Viper 5706v system. Start by disarming the system and turning off the ignition. Locate the trim pot on the sensor. Using a screwdriver, gently turn the pot to increase or decrease sensitivity. Test the sensor by moving your hand or an object near it to check the response. Fine-tune the adjustment until the sensor reacts appropriately without false triggers. Refer to the manual for specific calibration steps to ensure accurate detection and reliable security for your vehicle.
Customizing Alarm Settings
Customizing alarm settings on your Viper 5706v allows personalized security preferences. Access the settings through the remote control or control center. Adjust features like siren duration, shock sensor sensitivity, and alarm triggers. Enable or disable specific zones to tailor protection to your needs. Use the menu system to cycle through options, confirming each adjustment with the remote. Refer to the manual for detailed instructions to ensure all settings align with your vehicle’s security requirements. Proper customization enhances system effectiveness and provides peace of mind.
Integrating with Other Vehicle Systems
The Viper 5706v seamlessly integrates with various vehicle systems, enhancing functionality and convenience. It supports compatibility with keyless entry, immobilizers, and telematics systems. Use the wiring harness and module interfaces to connect with existing vehicle features. The system allows synchronization with aftermarket stereos and GPS devices, ensuring a unified control experience. Follow the manual’s guidelines to configure data ports and communication protocols for smooth integration. Testing post-integration ensures all systems operate harmoniously, providing a reliable and enhanced security solution tailored to your vehicle’s specifications.

Maintenance and Updates
Regularly update your Viper 5706v system to ensure optimal performance and security. Check for firmware updates via the manufacturer’s website and install them promptly. Clean sensors and connections to prevent interference. Schedule annual inspections by certified technicians to maintain system integrity. Refer to the manual for detailed maintenance schedules and troubleshooting guides. Keeping your system updated and well-maintained ensures long-term reliability and protection for your vehicle.
Regular Maintenance Tips
Regular maintenance is crucial to ensure your Viper 5706v system functions optimally. Start by inspecting all wiring connections and sensors for damage or corrosion. Clean the sensors periodically to maintain sensitivity. Update the system firmware whenever new versions are released to enhance performance and security. Test the remote start and alarm features monthly to verify proper operation. Check the battery health and ensure the control center is securely mounted. Refer to the manual for specific maintenance intervals and procedures. Consistent upkeep prevents malfunctions and ensures your vehicle remains protected and convenient to operate over time.
Updating Firmware and Software
Regularly updating your Viper 5706v’s firmware and software ensures optimal performance, security, and compatibility. To update, download the latest version from the official Directed Electronics website. Use a compatible USB cable to connect the control module to your computer. Follow the on-screen instructions to complete the update process. Always back up your settings before proceeding. Ensure the vehicle’s ignition is in the “on” position during the update to prevent interruptions. Once complete, test all features to confirm functionality. Updates may include enhanced features, bug fixes, and improved system responsiveness, keeping your security system at peak performance levels.
Proper installation and regular maintenance ensure optimal performance and security. Always follow the manual for troubleshooting and updates. Your Viper 5706v will provide reliable protection and convenience.
Final Checks After Installation
After completing the installation, perform a thorough system test. Ensure the remote start activates the engine and all security features function correctly. Check wiring connections for stability and verify sensor sensitivity. Test the alarm response to potential breaches and confirm the remote control range. Review the manual for any specific tests recommended for your vehicle type. Properly test the MTS Mode if installed in a manual transmission vehicle. Ensure all features are programmed correctly and the system operates seamlessly. Regular final checks prevent future issues and ensure your Viper 5706v system works efficiently.
Best Practices for Long-Term Use
For optimal performance, regularly update your Viper 5706v system with the latest firmware. Check and maintain battery health to prevent remote control issues. Inspect wiring connections periodically to avoid corrosion or damage. Adjust sensor sensitivity as needed to reduce false alarms. Familiarize yourself with the system’s features and settings to customize your experience. Keep the remote control in a safe place and replace batteries promptly. Refer to the manual for troubleshooting common issues and schedule professional maintenance if needed. By following these best practices, you ensure your Viper 5706v continues to protect and enhance your vehicle effectively over time.